Building a RingCentral bot from scratch


A RingCentral Team Messaging bot provides a conversational interface for performing common tasks. In this guide, you will learn how to build a simple ping-pong bot from scratch, giving you a closer look at the bot design pattern.
Try the RingCentral bot framework to get up and running faster and with less code.
Before you begin, make sure you have logged into your RingCentral developer account via the RingCentral Developer Console.
Step 1. Start ngrok
Bot servers must be accessible over the open Internet to allow RingCentral to send them messages. When developing a bot locally a tunneling tool like ngrok is useful.
Install ngrok
- Go to https://ngrok.com/ and download the version that corresponds to your platform. In our case, we'll be downloading the Mac OS X 64-bit version.
- You can extract ngrok into the folder of your preference and run ngrok from there.
Launch ngrok by running the following command:
$ ngrok http 3000
If every thing goes well you should see the following output to your terminal.
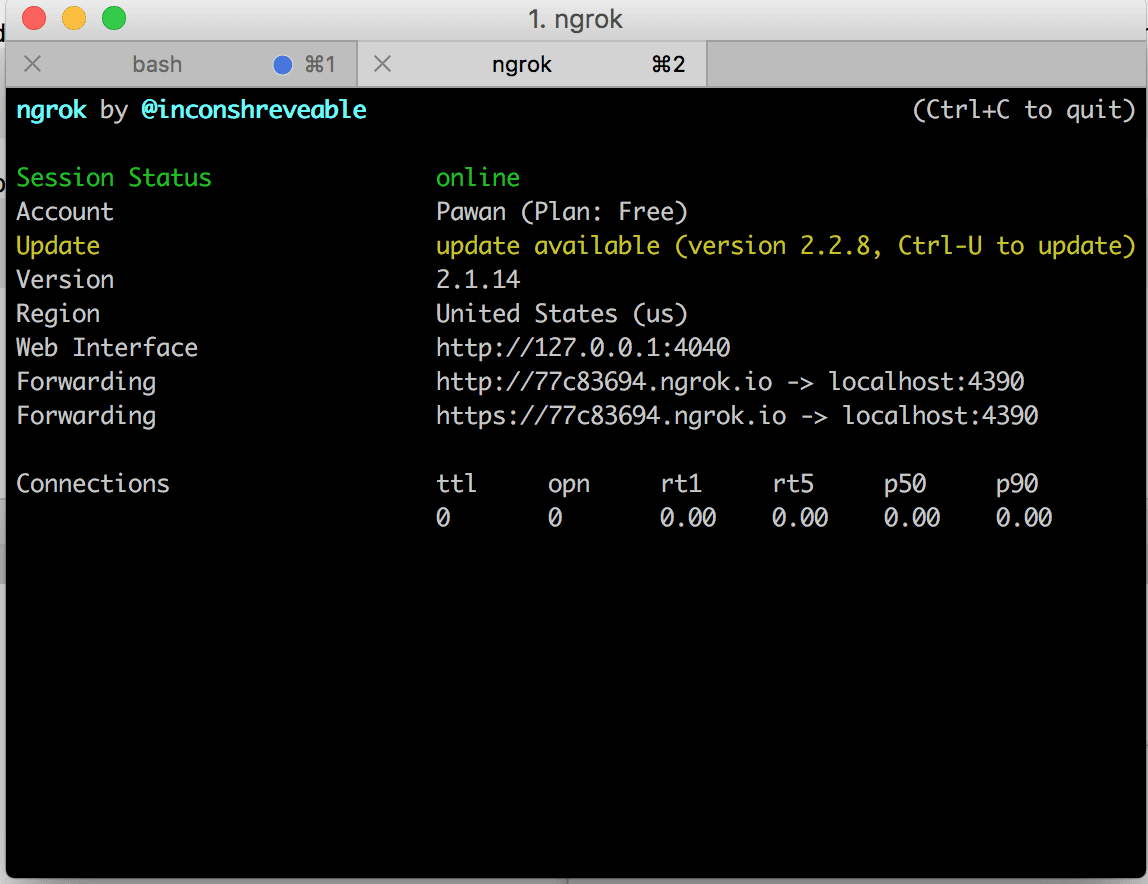
Make note of your https forwarding URL, we will use that shortly when creating your config file.
Step 2. Create a bot application
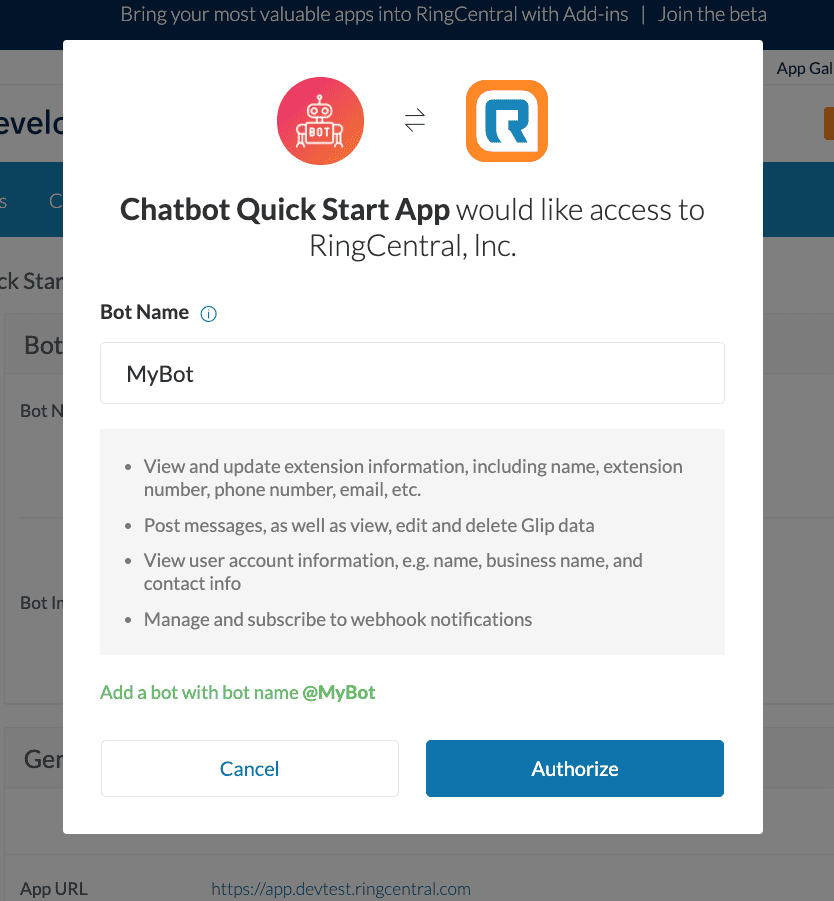
With a proxy running, we now have all the information we need to create an app in the RingCentral Developer Console. This can be done quickly by clicking the "Create Bot App" button below.
Create Bot App Show detailed instructions
- Login or create an account if you have not done so already.
- Go to Console/Apps and click 'Create App' button.
- Select "Bot App for Team Messaging" under "What type of app are you creating?"
- Select "Only members of my organization/company" under "Who will be authorized to access your app?"
- On the second page of the create app wizard, enter your app's name and description. Then select the following permissions:
- Team Messaging
- Webhook Subscriptions
- Read Accounts
What to build, a public or private bot?
The button above will help you create a private bot. But what is the difference between a public and private bot?
-
A private bot can only be installed into the account that created it, and therefore, can only correspond with users in your own personal account/organization.
-
A public bot on the other hand is typically listed in the App Gallery, and can be installed into any number of different RingCentral accounts.
Throughout this walkthrough we will highlight key differences between how you code for a public versus private bot. The button above will assist you in creating a private bot, a preference you can change if you wish.
Set your OAuth redirect URL
Before you create your bot app, you will need to set the OAuth redirect URL. Into that URL enter in the ngrok URL from above, with /oauth appended to the end. For example:
https://77c83694.ngrok.io/oauth
This URL will be invoked whenever your bot is installed, and will be the means by which you obtain an access token for the account of the user performing the installation.
Step 3. Clone and setup the sample application
To help you get started, we have a sample bot application that stubs out much of what you will need to create. Clone this Github repository, and install any required libraries like so:
$ git clone https://github.com/ringcentral-tutorials/ringcentral-bot-nodejs-demo.git
$ cd ringcentral-bot-nodejs-demo
$ npm install
Next, let's setup the environment and configuration of the bot. Copy the contents of env.template to .env.
$ cp env-template .env
Edit the .env you just created and enter in the values for RINGCENTRAL_CLIENT_ID and RINGCENTRAL_CLIENT_SECRET that you received when you created the bot in the RingCentral Developer Console above. Then, set RINGCENTRAL_OAUTH_REDIRECT_URI to your ngrok server URL. It would look something like this:
# .env file for the RingCentral Bot Walkthrough
RINGCENTRAL_CLIENT_ID=nrLCG6S9TH2MYSarxxxxxx
RINGCENTRAL_CLIENT_SECRET=ZPEpgGuPRlidSANQp1trcgHVfBvfBuTIScaZXoxxxxxx
RINGCENTRAL_SERVER_URL=https://platform.ringcentral.com

RINGCENTRAL_OAUTH_REDIRECT_URI=https://80c2-xx-yyy-201-33.ngrok.io/oauth
WEBHOOKS_DELIVERY_ADDRESS=https://80c2-xx-yyy-201-33.ngrok.io/webhook-callback
PORT=3000
Finally, launch your server.
$ npm start private
private-bot.js versus public-bot.js
In the repository you cloned above, you will find two different server apps: one for public bots and one for private bots, named accordingly. If you are building a public bot, start your server using the following command:
$ npm start public
Step 4. Add the bot to your RingCentral account
Return to the Developer Console and navigate to the dashboard for the app you recently created. Click on the "Install" found under the Credentials section.
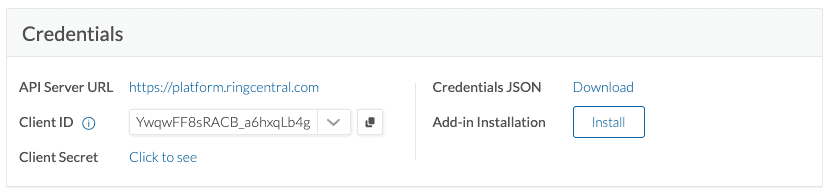
This will install the bot into your account. The RingCentral bot installation process first creates a special virtual user within your account, a.k.a. a "bot extension." Then RingCentral will attempt to generate an access token for this bot extension.
-
If the bot app is a private app, the access token will be generated and sent to the bot server via an HTTP POST request to the specified OAuth redirect URI.
-
If the bot app is a public app, an authorization code will be generated and sent to the bot server via an HTTP GET request to the specified OAuth redirect URI. The bot server will need to send a request to exchange the authorization code for an access token.
Both private and public bots will need the access token to subscribe to Team Messaging event notifications, and also to call the Team Messaging API to post messages.
The access token ultimately obtained through the above process is a permanent access token. This means you do not need to worry about refreshing the token after it has been issued. It is the developer's responsibility to manage and persist the access token.
A public bot access token is per user (customer) account, this means that every time a new RingCentral account installs the bot, the authorization procedure above will be repeated to generate an access token for the new user account. Thus, a public bot server must be able to keep multiple accounts' access tokens and use the access token to interact with each user account accordingly.
Code walkthrough: bot authorization
Sample code of a private bot auth handler:
// Handle authentication for a private bot
//
// When a private bot is installed, RingCentral sends an access token to the bot
// via an HTTP POST request through the specified redirect url. When the bot receives
// the access token, it can use the token to post messages to bot users.
//
// In this tutorial, we store the access token in a file so that we can reuse it
// every time we terminate and restart the bot.

// If the access token is lost, you will need to remove and reinstall the bot in order
// to obtain a new access token.

// In a real production implementation, the acess token should be saved in a more secure
// place and persistent so that it can be reliably re-used if the bot is restarted.
app.post('/oauth', async function (req, res) {
  console.log("Private bot being installed");
  if (req.body.access_token) {
    res.status(200).send('')
    // Bot access token is almost permanent. Thus, there is no need for a refresh token!
    // For calling RC Team Messaging API to post messages using the RingCentral JS SDK, we need
    // to create a token object and set it to the SDK's platform instance.

    // First, we get an empty token object from the platform instance, then we assign the
    // access token, the token type and other fake values to satify the SDK's tokens syntax.
    var tokenObj = platform.auth().data();
    tokenObj.access_token = req.body.access_token;
    tokenObj.token_type = "bearer"
    tokenObj.expires_in = 100000000000;
    tokenObj.refresh_token = 'xxx';
    tokenObj.refresh_token_expires_in = 10000000000;

    // Finally, we set the token object back to the platform instance and also save it to a file
    // for reuse.
    await platform.auth().setData(tokenObj);
    console.log( "Save tokens to a local file for reuse" )
    fs.writeFileSync( TOKEN_TEMP_FILE, JSON.stringify( tokenObj ) )

    console.log("Bot installation done")
    // The bot must subscribe for Team Messaging events notification so that it can receive messages
    // and other important events notification from bot users and from RingCentral server.
    subscribeToEvents()
  }else{
    res.status(401).end()
  }
});
// Handle authorization for public bots
//
// When a public bot is installed, RingCentral sends an authorization code to the bot via
// an HTTP GET request through the specified redirect url. When the bot receives
// the authorization code, it must uses the code to exchange for an access token.

// In this tutorial, we store the access tokens in a file so that we can reuse it
// every time we terminate and restart the bot.

// If the access token of a user's account is lost, the customer will need to reinstall
// the bot in order for the bot to obtain a new access token for that account.

// In a real production implementation, the acess token should be saved in a more secure
// place and persistent so that it can be reliably re-used if the bot is restarted.
app.get('/oauth', async function (req, res) {
    console.log("Public bot being installed");
    if (!req.query.code){
        res.status(500).send({"Error": "Authorization code is missing."})
        console.log("RingCentral did not send an authorizaton code.");
    } else {
        var creatorId = req.query.creator_extension_id;
        try {
          var params = {
              code : req.query.code,
              redirectUri : process.env.RC_REDIRECT_URL
          }
          var platform = rcsdk.platform()
          var resp = await platform.login(params)
          // Get bot access token. The tokens is per user's account
          var tokens = await resp.json()

          // Get user's account id. The account id will be used to identify a public user so that we
          // can use the correct access token to post messages to users under that account.
          var resp1 = await platform.get('/restapi/v1.0/account/~/extension/~')
          var jsonObj = await resp1.json()

          // Bot access token is almost permanent. Thus, there is no refresh token associated with the access token!
          // However, before saving the access token for reuse, we assign fake refresh token values to satify
          // the SDK's tokens syntax.
            tokens['refresh_token'] = 'xxx';
            tokens['refresh_token_expires_in'] = 10000000000;

          // Make an account token object for reuse
          var accountTokenObj = {
            ownerId: tokens.owner_id, // Bot extension id
            accountId: jsonObj.account.id, // User account id
            tokens: tokens,
            subscriptionId: ''
          }
          // Add this new token object to our accountTokens array
          accountTokens.push(accountTokenObj)
          res.status(200).send("")
          console.log("Subscribe to Webhooks notification")
          // The bot must subscribe for Team Messaging notifications so that it can receive messages
          // from RingCentral server and from bot users.
          subscribeToEvents(platform, accountTokenObj);
        }catch(e){
          console.error(e.message)
            res.status(500).send({"Error": "Installing bot and subscribing to events failed."})
        }
    }
});
After getting an access token, the bot must subscribe to Team Messaging event notifications in order to receive messages and important events from users and from RingCentral servers.
Code walkthrough: subscribing to bot events
Private bots
Calling the function to subscribe to events
    // The bot must subscribe for Team Messaging events notification so that it can receive messages
    // and other important events notification from bot users and from RingCentral server.
    subscribeToEvents()
The function to subscribe to events
// Method to Subscribe for events notification.
async function subscribeToEvents(){
  console.log("Subscribing to posts and groups events")
  var requestData = {
    eventFilters: [
      "/team-messaging/v1/posts", // Team Messaging (a.k.a Glip) events.
      "/team-messaging/v1/chats", // Team Messaging (a.k.a Glip) events.
      "/restapi/v1.0/account/~/extension/~", // Subscribe for this event to detect when a bot is uninstalled
      "/restapi/v1.0/subscription/~?threshold=60&interval=15" // For subscription renewal
    ],
    deliveryMode: {
      transportType: "WebHook",
      address: process.env.WEBHOOK_DELIVERY_ADDRESS
    },
    expiresIn: 604799
  };
  try {
    var resp = await platform.post('/restapi/v1.0/subscription', requestData)
    var jsonObj = await resp.json()
    console.log('Team Messaging events notifications subscribed successfully.');
    // Save the subscription id to a file so that we can check its status every time the
    // bot is restarted.
    fs.writeFileSync( SUBSCRIPTION_ID_TEMP_FILE, jsonObj.id )
    console.log('Your bot is ready for conversations ...');
  }catch (e) {
    console.error('Team Messaging events notifications subscription failed. ', e);
    throw e;
  }
}
Public bots
Calling the function to subscribe to events
          // The bot must subscribe for Team Messaging notifications so that it can receive messages
          // from RingCentral server and from bot users.
          subscribeToEvents(platform, accountTokenObj);
The function to subscribe to events
// Method to Subscribe for events notification.
async function subscribeToEvents(p, accountTokenObj){
    console.log("Subscribing to posts and groups events")
    var requestData = {
        "eventFilters": [
            "/team-messaging/v1/posts", // Team Messaging (a.k.a Glip) Events.
            "/team-messaging/v1/chats", // Team Messaging (a.k.a Glip) Events.
            "/restapi/v1.0/account/~/extension/~", // Subscribe for this event to detect when a bot is uninstalled
            "/restapi/v1.0/subscription/~?threshold=60&interval=15" // For subscription renewal
        ],
        "deliveryMode": {
            "transportType": "WebHook",
            "address": process.env.WEBHOOK_DELIVERY_ADDRESS
        },
        "expiresIn": 604799
    };
    try {
      var resp = await p.post('/restapi/v1.0/subscription', requestData)
      var jsonObj = await resp.json()
      console.log('Team Messaging events notifications subscribed successfully.');
      accountTokenObj.subscriptionId = jsonObj.id

      // Save tokens to a file so that we can reuse the access token after we terminate and
      // restart the bot.
      fs.writeFileSync( TOKEN_TEMP_FILE, JSON.stringify( accountTokens ) )
      console.log('Your bot is ready for conversations ...');
    }catch (e) {
      console.error('Team Messaging events notifications subscription failed. ', e);
      throw e;
    }
}
Discussion: observe the console of your local bot server
Turn your attention to your console to see the output from your server. You will see a trace of the process so far in which your server is subscribing to the necessary events.
ringcentral-bot-nodejs-demo % node private-bot
Bot server listening on port 3000
Your bot has not been installed or the saved access token was lost!
Login to developers.ringcentral.com, open the bot app and install it by selecting the Bot menu and at the 'General Settings' section, click the 'Add to RingCentral' button.
Note: If the bot was installed, remove it and reinstall to get a new access token
Private bot being installed
Save tokens to a local file for reuse
Bot installation done
Subscribing to posts and groups events
Verifying Webhook token.
Team Messaging events notifications subscribed successfully.
Your bot is ready for conversations ...
Soon, your server will begin receiving events, including events corresponding to your bot extension being created, the creation of a personal chat with the bot, and bot joining the default 'All Employees' group. These events look something like this.
Event: Bot extension being created
{
  extensionId: '707406005',
  eventType: 'Create',
  hints: [ 'ExtensionInfo' ]
}
Event: A personal chat being created for the bot
{
  id: '765657090',
  name: null,
  description: null,
  type: 'PersonalChat',
  status: 'Active',
  members: [ '707406005' ],
  isPublic: null,
  creationTime: '2022-01-06T18:09:50.936Z',
  lastModifiedTime: '2022-01-06T18:09:50.936Z',
  eventType: 'GroupJoined'
}
Event: The bot being added to the "All Employees" group
{
  id: '45113350',
  name: 'All Employees',
  description: null,
  type: 'Everyone',
  status: 'Active',
  members: [
    '178009004', '260981004',
    '233723004', '186478004',
    '186639004', '288101004',
    ...
  ],
  isPublic: false,
  creationTime: '2017-07-07T21:29:32.259Z',
  lastModifiedTime: '2022-01-06T18:09:13.311Z',
  eventType: 'GroupJoined'
}
Step 5. Send your first message to the bot
Now, login to the RingCentral app using your user credentials and start a chat with the bot you installed.
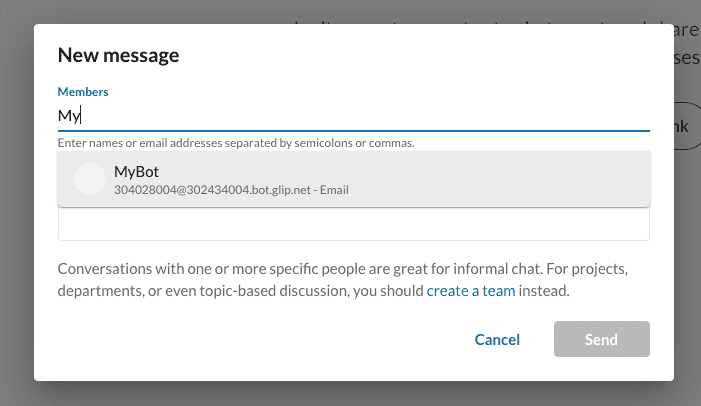
Then, within the chat you just created, type 'ping' and send it to the bot.
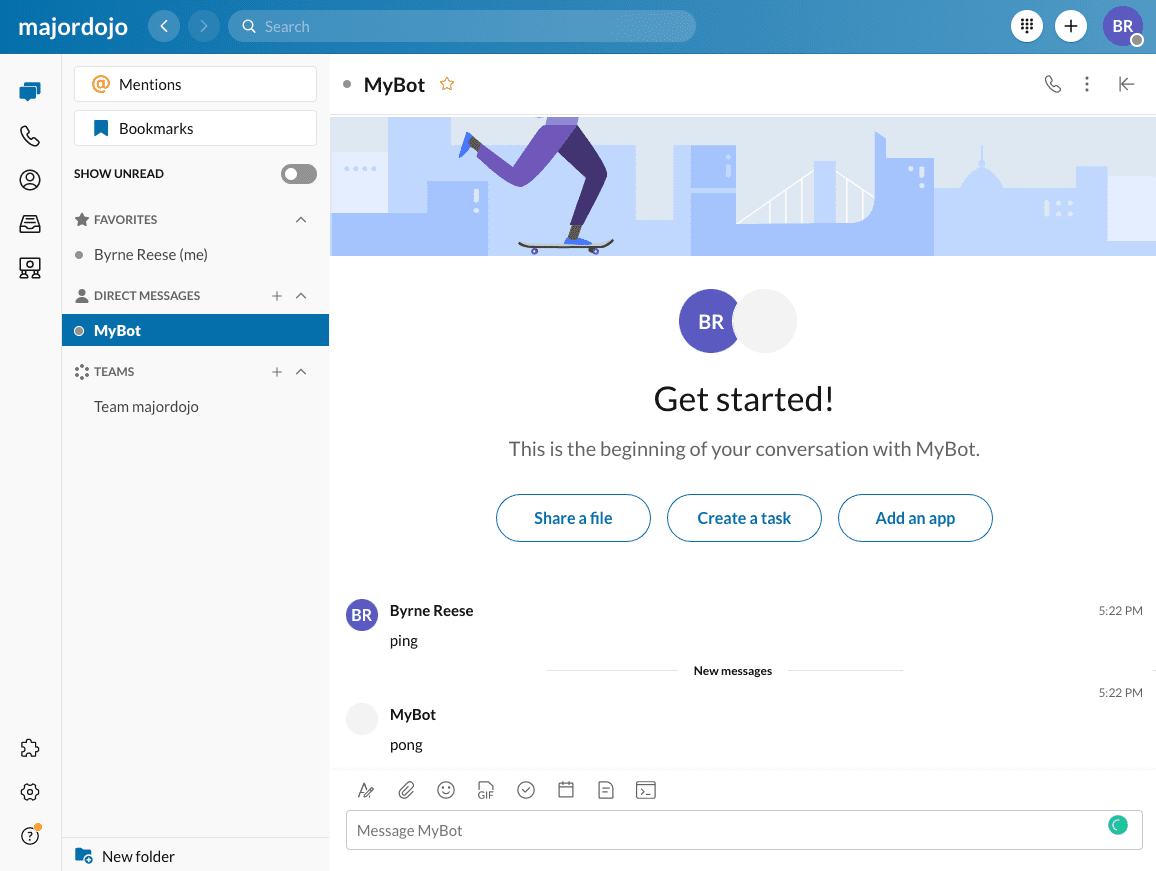
You will notice that the bot responds 'pong' to your message.
Code walkthrough: sending and receiving bot messages
The sample code below shows a private bot receiving a user's message and responding to the user with a message.
// Callback method received after subscribing to webhook. This method handles webhook
// notifications and will be invoked when a user sends a message to your bot, and when
// the bot is added to/removed from a group or a team etc.
app.post('/webhook-callback', async function (req, res) {


  } else if (req.body.body.eventType == "PostAdded") {
    var body = req.body.body
    console.log("Received user's message: " + body.text);
    console.log(req.body)
    if (req.body.ownerId == body.creatorId) {
      console.log("Ignoring message posted by bot.");
    } else if (body.text == "ping") {
      send_message( body.groupId, "pong" )
    // Add more bot commands here by training your bot to respond to different keywords
    // } else if (req.body.body.text == "some keyword") {
    //   send_message( body.groupId, "reply message" )
    } else if (body.text == "hello") {


});


// Post a message to a chat
async function send_message( groupId, message ) {
    console.log("Posting response to group: " + groupId);
    try {
      await platform.post(`/team-messaging/v1/chats/${groupId}/posts`, {
         "text": message
       })
    }catch(e) {
        console.log(e)
    }
}
The sample code below shows a public bot receiving a user's message and responding to the user with a message. A key difference between a public and private bot is that a public bot needs to load the correct access token corresponding to the account they will need to post a message back to. If the wrong access token is used, then you will receive an error.
// Callback method received after subscribing to webhook. This method handles webhook
// notifications and will be invoked when a user sends a message to your bot, and when
// the bot is added to/removed from a group or a team etc.
app.post('/webhook-callback', async function (req, res) {


    } else if (req.body.body.eventType == "PostAdded") {
      // get the account's token object
      var account = accountTokens.find(o => o.ownerId == req.body.ownerId)
      if (account){
        var platform = rcsdk.platform()
        await platform.auth().setData(account.tokens)
        var body = req.body.body
        console.log("Received user's message: " + body.text);
        console.log(req.body)
        if (req.body.ownerId == body.creatorId) {
          console.log("Ignoring message posted by bot.");
        } else if (body.text == "ping") {
          send_message( platform, body.groupId, "pong" )
        // Add more bot commands here by training your bot to respond to different keywords
        //} else if (req.body.body.text == "some keyword") {
          // send_message( body.groupId, "reply message" )
        } else if (body.text == "hello") {


});


// Post a message to a chat
async function send_message( p, groupId, message ) {
    console.log("Posting response to group: " + groupId);
    try {
      await p.post(`/team-messaging/v1/chats/${groupId}/posts`, {
         "text": message
       })
     }catch(e) {
      console.log(e)
    }
}
Discussion: observe your bot sending and receiving messages
Turn your attention to your console to see the output from your server. Along with a number of other log messages, You will begin to see events corresponding to your bot receiving and posting messages.
Event: Bot receiving a message
{
  uuid: '8987221663935761370',
  event: '/team-messaging//v1/posts',
  timestamp: '2022-01-06T19:10:51.808Z',
  subscriptionId: '56b8f636-1b1a-4255-9479-84a30c0f9d23',
  ownerId: '707525005',
  body: {
    id: '5782921220',
    groupId: '765714434',
    type: 'TextMessage',
    text: 'ping',
    creatorId: '178009004',
    addedPersonIds: null,
    creationTime: '2022-01-06T19:10:51.386Z',
    lastModifiedTime: '2022-01-06T19:10:51.386Z',
    attachments: null,
    activity: null,
    title: null,
    iconUri: null,
    iconEmoji: null,
    mentions: null,
    eventType: 'PostAdded'
  }
}
Event: bot sending a message
{
  uuid: '4474463302007747908',
  event: '/team-messaging/v1/posts',
  timestamp: '2022-01-06T19:10:53.916Z',
  subscriptionId: '56b8f636-1b1a-4255-9479-84a30c0f9d23',
  ownerId: '707525005',
  body: {
    id: '5782929412',
    groupId: '765714434',
    type: 'TextMessage',
    text: 'pong',
    creatorId: '707525005',
    addedPersonIds: null,
    creationTime: '2022-01-06T19:10:53.022Z',
    lastModifiedTime: '2022-01-06T19:10:53.022Z',
    attachments: null,
    activity: null,
    title: null,
    iconUri: null,
    iconEmoji: null,
    mentions: null,
    eventType: 'PostAdded'
  }
}
Step 6. Enhance the app to respond to more message
In the final step, we will modify the sample application to respond to your sending of custom messages to the bot. Begin by editing either the private-bot.js or the public-bot.js file in your favorite editor. Uncomment the else if and send_message lines below. Then select your own custom command or "keyword" your bot will respond to, and then post a reply when that keyword is received.
    // Add more bot commands here by training your bot to respond to different keywords
    // } else if (req.body.body.text == "some keyword") {
    //   send_message( body.groupId, "reply message" )
Summary
This guide has walked you through the creation of a simple bot server using Javascript. The bot server itself is rudimentary, but should help you to understand the basic underlying components and functions your bot server will be responsible for. If you are a Javascript developer, be sure to checkout RingCentral's Javascript bot framework which provides a more full-featured bot server right out of the box.
Up next: adaptive cards
In part two of this developer's guide, we will extend this basic bot to include the functionality of posting adaptive cards and responding to interactive messaging events.