Authorization code flow


RingCentral supports the OAuth 2.0 authorization code flow, one of the most common authorization methods used by app developers to request and gain access to another user's account via an API. You may see it referred to as a "3-legged authorization flow" because it involves three distinct steps in obtaining an access token used to call the API. Those steps are:
- Authorization is requested and granted via a user interface.
- A grant is exchanged for an access token via an API call.
- The access token is used to call the API to access a protected resource.
 }
}
Developers are encouraged to implement the nearly identical PKCE auth code flow for better security.
What are the benefits of using the authorization code flow?
The auth code flow works to:
- Keep a user's personal login credentials secure, and out of the hands of a third party.
- Disclose what permissions an app requires.
- Prompt users to explicitly authorize an app to access their data.
- Provide developers with a token that can be used by their applications to act on another user's behalf.
When should I use the authorization code flow?
The auth code flow is the most common form of OAuth used on the Internet, and is ideal in the following scenarios:
- Your application is web-based.
- Your application has a server component capable of receiving HTTP requests from RingCentral.
- Your application exposes a user interface via which users can initiate the login process.
- Your application requires access to a specific user's account.
Authorization code flow in detail
Step 1. Compose a "request authorization" URL
The authorization process is initiated by an end user clicking a URL composed by the application requesting access to their RingCentral account. This URL will contain the following query parameters:
| Parameter | Type | Description |
|---|---|---|
response_type |
string | Required. Must be set to code. |
client_id |
string | Required. The client ID of the application making the request. |
redirect_uri |
URL | Required. The URL the response will be sent to. is is a callback URI which determines where the response will be sent to. The value of this parameter must exactly match one of the URIs you provided when creating your app. |
state |
string | Optional. A pass-through value used by the client to maintain state between the request and callback. RingCentral ignore the values of this parameter. |
scope |
string | Ignored. Common to other OAuth apps, the scope parameter is ignored by RingCentral deferring to the permissions set by the developer when the app was created. It can be safely omitted. |
brandId |
integer | Optional. A number identifying what branding should be displayed on the login page. |
display |
string | This is for RingCentral-use only and can be safely omitted. |
prompt |
string | This is for RingCentral-use only and can be safely omitted. |
Example Login URL
Below is an example URL to initiate the authorization flow.
https://platform.ringcentral.com/restapi/oauth/authorize?response_type=code&redirect_uri=<my_uri>&client_id=<client_id>
Using an SDK to generate a login URL
We recommend developers use an SDK to generate a login URL to ensure it is composed properly.
const RC = require('@ringcentral/sdk').SDK
var rcsdk = new RC({
    'server':       process.env.RC_SERVER_URL,
    'clientId':     process.env.RC_APP_CLIENT_ID,
    'clientSecret': process.env.RC_APP_CLIENT_SECRET,
    'redirectUri':  process.env.RC_REDIRECT_URI
});
var platform = rcsdk.platform();

console.log( "Login URL: ", platform.loginUrl({ "state": "1234567890" }) )
Step 2. User login and consent
At this step, your app’s user is redirected by the browser to a RingCentral authorization page, where they are first asked to log in (if they have not already).
Once users have logged in, RingCentral prompts them with an "Access Request," which discloses the permissions the app is requesting.
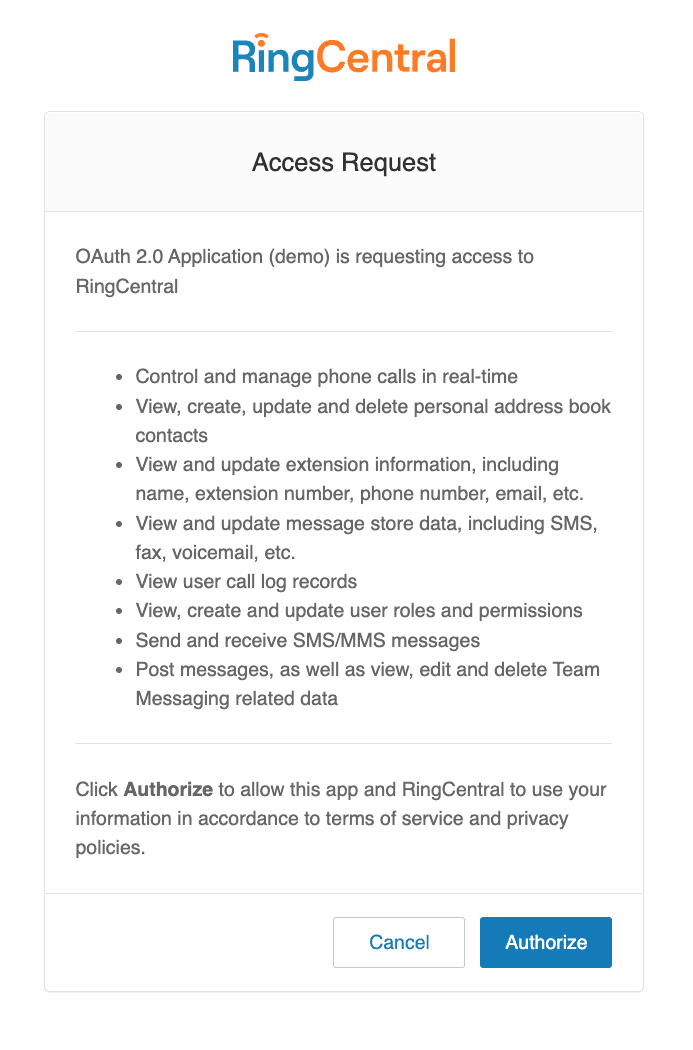
When the user clicks "Authorize," the user is then redirected to the redirect_uri that was passed in via the login URL constructed above. At the same time, RingCentral will add the following query parameters to the redirect URI, which your application will need in subsequent steps.
| Parameter | Type | Description |
|---|---|---|
code |
string | The authorization code returned for your application. |
expires_in |
integer | The remaining lifetime of the authorization code. |
state |
string | The verbatim value of the state parameter received via the login URL. |
For security purposes, the redirect_uri must exactly match at least one of the Redirect URIs provided by the developer when the app was created.
Example OAuth redirect
HTTP/1.1 302 Found
Location: https://myapp.example.com/oauth2Callback?code=SplxlOBeZQQYbYS6WxSbIA&state=xyz&expires_in=60
Step 3. Exchange authorization code for an access token
The 'code' your application receives at your Redirect URI is a temporary authorization grant used to obtain an access token to call the API. If the token is not redeemed in the allotted time, the user will need to go through the login and authorization process again. This is the final step before your app can call the RingCentral API.
To exchange an auth code for an access token, developers will call the RingCentral API accordingly:
Access token request
HTTP Headers
| Header | Value |
|---|---|
Content-type |
application/x-www-form-urlencoded |
Authorization |
Basic + base64_encoded( Client ID + ":" Client Secret ) |
POST Parameters
| Parameter | Type | Description |
|---|---|---|
grant_type |
string | Required. Must be set to authorization_code for authorization code flow |
code |
string | Required. Provide your authorization code received in the previous step |
client_id |
string | Required. Enter your application client id here |
redirect_uri |
URI | Required. This is a callback URI which determines where the response is sent. The value of this parameter must exactly match one of the URIs you have provided for your app upon registration. |
access_token_ttl |
integer | Optional. Access token lifetime in seconds; the possible values are from 600 sec (10 min) to 3600 sec (1 hour). The default value is 3600 sec. If the value specified exceeds the default one, the default value is set. If the value specified is less than 600 seconds, the minimum value (600 sec) is set |
refresh_token_ttl |
integer | Optional. Refresh token lifetime in seconds. The default value depends on the client application, but as usual it equals to 7 days. If the value specified exceeds the default one, the default value is applied |
Sample Request
POST /restapi/oauth/token HTTP/1.1
Accept: application/json
Content-Type: application/x-www-form-urlencoded
Authorization: Basic cmVsLWFsbC1wZXJtaXNzaWXFjMmpRZmlQcnlkSUkweE92QQ==

code=U0pDMTFQMDFQQVMwMXxBQUJfTVpHWk5lM29zNVFmWnNHQ01MSmJuMHJmNGlRcnRaeEptTWlPS0MzUTdYRDdSTURiaH
  BuWHZINGM2WTdqaWlBOEVhRHNxRWdJVUNYQjd4dmJsWHJoVVlWQVN2SFo2YWJPanJsRkFWZk9SMm5lek0tWnF5d3h8C3A
  nYOPxO0flEwO6Ffoq9Tlqs1s&grant_type=authorization_code
  &redirect_uri=https%3A%2F%2Fmyapp.acme.com%2Foauth2redirect
Access token response
The server responds with an access token which can presented in subsequent requests in the HTTP Authorization header to authorize API Calls. The response will contain the following parameters:
| Parameter | Type | Description |
|---|---|---|
access_token |
string | Access token to pass to subsequent API requests |
expires_in |
integer | Issued access token TTL (time to live), in seconds |
refresh_token |
string | Refresh token to get a new access token, when the issued one expires |
refresh_token_expires_in |
integer | Issued refresh token TTL (time to live), in seconds |
scope |
string | List of permissions allowed with this access token, white-space separated |
token_type |
string | Type of token. The only possible value supported is 'Bearer'. This value should be used when specifying access token in Authorization header of subsequent API requests |
owner_id |
string | Extension identifier |
Sample Response
HTTP/1.1 200 OK
Content-Type: application/json

{
   "access_token" : "U1BCMDFUMDRKV1MwMXxzLFSvXdw5PHMsVLEn_MrtcyxUsw",
   "token_type" : "bearer",
   "expires_in" : 7199,
   "refresh_token" : "U1BCMDFUMDRKV1MwMXxzLFL4ec6A0XMsUv9wLriecyxS_w",
   "refresh_token_expires_in" : 604799,
   "scope" : "AccountInfo CallLog ExtensionInfo Messages SMS",
   "owner_id" : "256440016"
}
Step 4. Make your API calls
With an access token in hand, you can now call the API to access the authorizing user's account. The access token is transmitted to the API via the HTTP Authorization header as shown below.
POST /restapi/oauth/token HTTP/1.1
Accept: application/json
Content-Type: application/json
Authorization: Bearer U0pDMTFQMDFQQVMwMXxBQUJfTVpHWk5lM29zNVFm
  WnNHQ01MSmJuMHJmNGlRcnRaeEptTWlPS0MzUTdYRDdSTURiaHBuWHZINGM2
  WTdqaWlBOEVhRHNxRWdJVUNYQjd4dmJsWHJoVVlWQVN2SFo2YWJPanJsRkFW
  Zk9SMm5lek0tWnF5d3h8C3AnYOPxO0flEwO6Ffoq9Tlqs1s