Building a RingCentral bot from scratch: posting adaptive cards with bots


Quick review
Welcome to part two of our bot development guide. In part one, we take developers through the basic architectural building blocks of a simple bot add-in. We demonstrate:
- How to create a bot
- How to install and test a bot
- How to subscribe to post and chat events
- How to post and respond to simple text messages
What's next?
In part two of our bot development guide, we round out the bot we started to build with a full-circle use case common to many bots:
- Post a card
- Process input from a user interacting with the card
- Updating the card previously posted, to reflect a state change
Posting cards via a bot
Bots post adaptive cards to a chat via the REST API, for which a different set of operations exist. To post a card to a chat, we use the createCard operation. Let's add the following method to your bot app:
Sample code of a private bot:
// Send an adaptive card to a chat
async function send_card( groupId, card ) {
    console.log("Posting a card to group: " + groupId);
    try {
      var resp = await platform.post(`/team-messaging/v1/chats/${groupId}/adaptive-cards`, card)
    }catch (e) {
      console.log(e)
    }
}
Sample code of a public bot:
// Send an adaptive card to a chat
async function send_card( p, groupId, card ) {
    console.log("Posting a card to group: " + groupId);
    try {
      var resp = await p.post(`/team-messaging/v1/chats/${groupId}/adaptive-cards`, card)
    }catch (e) {
      console.log(e)
    }
}
Next, we want to update the bot to respond to a new command. When a user types "hello" to the bot, the bot will respond by posting a card. Let's update our callback handler accordingly:
Sample code of a private bot:
// Callback method received after subscribing to webhook. This method handles webhook
// notifications and will be invoked when a user sends a message to your bot, and when
// the bot is added to/removed from a group or a team etc.
app.post('/webhook-callback', async function (req, res) {


    } else if (body.text == "hello") {
      var card = make_hello_world_card(null)
      send_card( body.groupId, card )
    } else {


});


// Send an adaptive card to a chat
async function send_card( groupId, card ) {
    console.log("Posting a card to group: " + groupId);
    try {
      var resp = await platform.post(`/team-messaging/v1/chats/${groupId}/adaptive-cards`, card)
    }catch (e) {
      console.log(e)
    }
}
Sample code of a public bot:
// Callback method received after subscribing to webhook. This method handles webhook
// notifications and will be invoked when a user sends a message to your bot, and when
// the bot is added to/removed from a group or a team etc.
app.post('/webhook-callback', async function (req, res) {


        } else if (body.text == "hello") {
          var card = make_hello_world_card(null)
          send_card( platform, body.groupId, card )


});


// Send an adaptive card to a chat
async function send_card( p, groupId, card ) {
    console.log("Posting a card to group: " + groupId);
    try {
      var resp = await p.post(`/team-messaging/v1/chats/${groupId}/adaptive-cards`, card)
    }catch (e) {
      console.log(e)
    }
}
Finally, create a helper function to return the JSON for an adaptive card:
function make_hello_world_card(name) {
    var card = {
        type: "AdaptiveCard",
        $schema: "http://adaptivecards.io/schemas/adaptive-card.json",
        version: "1.3",
        body: [
        {
            type: "TextBlock",
            size: "Medium",
          weight: "Bolder",
            text: "Hello World"
        },
        {
            type: "TextBlock",
            text: "Enter your name in the field below so that I can say hello.",
            wrap: true
        },
        {
            type: "Input.Text",
            id: "hellotext",
            placeholder: "Enter your name"
        },
        {
          type: "ActionSet",
          actions: [
            {
              type: "Action.Submit",
              title: "Send a new card",
              data: {
                path: "new-card"
              }
            },
            {
              type: "Action.Submit",
              title: "Update this card",
              data: {
                path: "update-card"
              }
            }
          ]
        }
      ]
    }
    if (name){
      card.body.push({
          type: "Container",
          separator: true,
          items: [
            {
              type: "TextBlock",
                text: `Hello ${name}`,
                wrap: true
            }
          ]
        })
    }
    return card
}
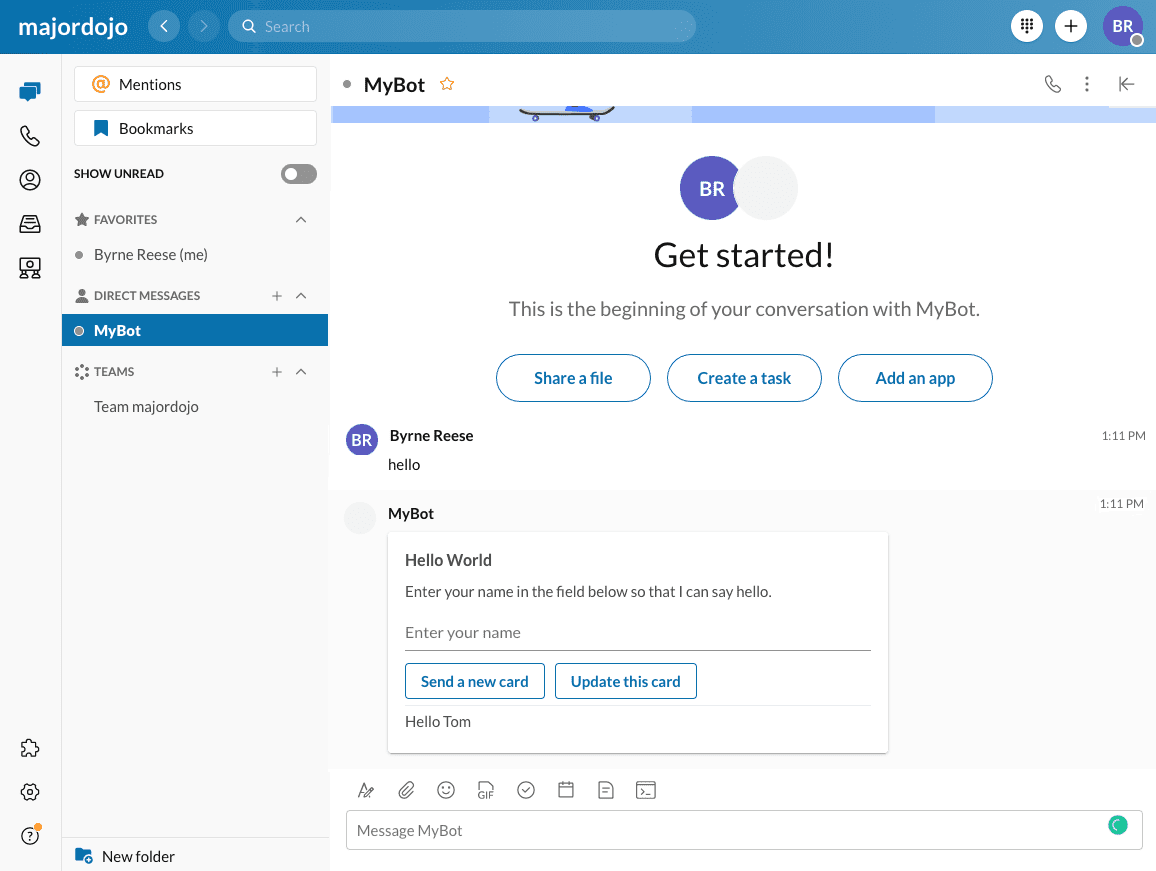
With the above changes made to your bot app, you will be able to post an adaptive card instead of just a text message.
Receiving interactive messaging events
Now, let's update our bot application again. This time we will add functionality to allow your bot to receive messaging events when a user submits data via the adaptive card posted above.
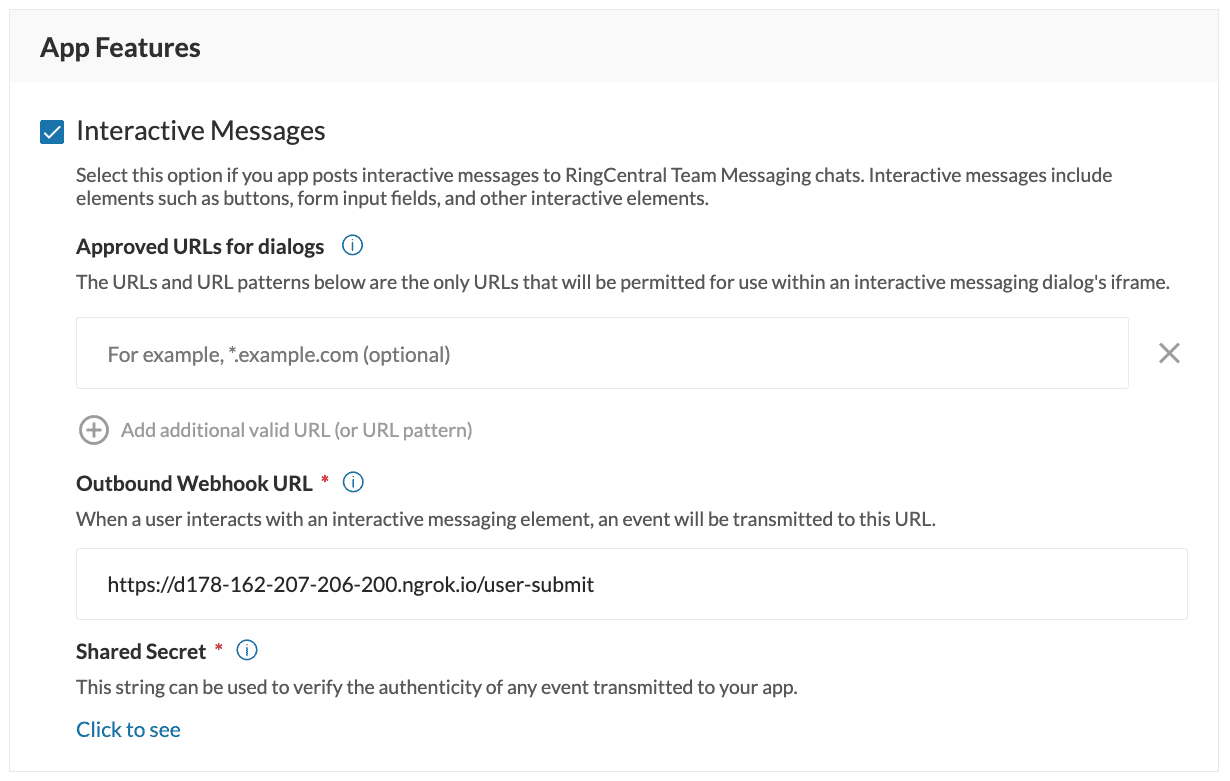
First, let's update the settings of your bot to send outbound Webhook when users interact with your card.
- Navigate to the "Settings" screen for your bot inside of the Developer Console.
- Scroll to the bottom, and enable the feature "Interactive Messages" feature.
- In the Outbound Webhook URL field, enter in the URL at which your app will receive events.
Next, we go back to our code to add an express handler for receiving adaptive card events.
Sample code of a private bot
// This handler is called when a user submit data from an adaptive card
app.post('/user-submit', function (req, res) {
    console.log( "Received card event." )
    var body = req.body
    if (body.data.path == 'new-card'){
      var card = make_new_name_card( body.data.hellotext )
      send_card( body.conversation.id, card)
    }else if (body.data.path == 'update-card'){
      var card = make_hello_world_card( body.data.hellotext )
      update_card( body.card.id, card )
    }
    res.status(200).end();
});
Sample code of a public bot
// This handler is called when a user submit data from an adaptive card
app.post('/user-submit', async function (req, res) {
    console.log( "Received card event." )
    res.status(200).end()
    var body = req.body
    // get the account's token object
    var account = accountTokens.find(o => o.accountId == body.user.accountId)
    if (account){
      console.log("Customer account found", account.accountId)
      var platform = rcsdk.platform()
      await platform.auth().setData(account.tokens)
      if (body.data.path == 'new-card'){
        var card = make_new_name_card( body.data.hellotext )
        send_card( platform, body.conversation.id, card)
      }else if (body.data.path == 'update-card'){
        var card = make_hello_world_card( body.data.hellotext )
        update_card( platform, body.card.id, card )
      }
    }
});
The main difference between a public bot and a private bot is that a private bot always posts messages to the same account, while a public bot could be posting messages to any number of different RingCentral accounts. For this reason, a private bot only needs to keep track of one access token (the one corresponding to your account), and a public bot needs to maintain a mapping of accounts and access tokens.
Then, when a public bot receives a message, it first determines the poster's account Id, then looks up the access token corresponding to that account, and then uses that access token to post or update a message in that user's account.
In this example, we demonstrate both how to send a response by posting a new card, and how to update a card that was previously posted.
You will observe that the card we posted contains two buttons, one to instruct the server to post a response as a new card, and one to instruct the server to update the existing card specified in the data.path value. When we receive a user-submit event, we will detect the data.path value and decide to post back accordingly.
function make_hello_world_card(name) {
    var card = {
        type: "AdaptiveCard",
        $schema: "http://adaptivecards.io/schemas/adaptive-card.json",
        version: "1.3",
        body: [
        {
            type: "TextBlock",
            size: "Medium",
          weight: "Bolder",
            text: "Hello World"
        },
        {
            type: "TextBlock",
            text: "Enter your name in the field below so that I can say hello.",
            wrap: true
        },
        {
            type: "Input.Text",
            id: "hellotext",
            placeholder: "Enter your name"
        },
        {
          type: "ActionSet",
          actions: [
            {
              type: "Action.Submit",
              title: "Send a new card",
              data: {
                path: "new-card"
              }
            },
            {
              type: "Action.Submit",
              title: "Update this card",
              data: {
                path: "update-card"
              }
            }
          ]
        }
      ]
    }
    if (name){
      card.body.push({
          type: "Container",
          separator: true,
          items: [
            {
              type: "TextBlock",
                text: `Hello ${name}`,
                wrap: true
            }
          ]
        })
    }
    return card
}
Send response in a new card
// This handler is called when a user submit data from an adaptive card
app.post('/user-submit', function (req, res) {
    console.log( "Received card event." )
    var body = req.body
    if (body.data.path == 'new-card'){
      var card = make_new_name_card( body.data.hellotext )
      send_card( body.conversation.id, card)
    }else if (body.data.path == 'update-card'){


    }
    res.status(200).end();
});

// Send an adaptive card to a chat
async function send_card( groupId, card ) {
    console.log("Posting a card to group: " + groupId);
    try {
      var resp = await platform.post(`/team-messaging/v1/chats/${groupId}/adaptive-cards`, card)
    }catch (e) {
      console.log(e)
    }
}

Update a card with the response
// This handler is called when a user submit data from an adaptive card
app.post('/user-submit', function (req, res) {
    console.log( "Received card event." )
    var body = req.body


    }else if (body.data.path == 'update-card'){
      var card = make_hello_world_card( body.data.hellotext )
      update_card( body.card.id, card )
    }
    res.status(200).end();
});

// Update an adaptive card
async function update_card( cardId, card ) {
    console.log("Updating card...");
    try {
      var resp = await platform.put(`/team-messaging/v1/adaptive-cards/${cardId}`, card)
    }catch (e) {
      console.log(e.message)
    }
}
How will your bot be different?
With the above code in place, all the building blocks of a great bot that include the most common user flows are in place. But how will your bot likely be different?
For starters, your bot will respond to a different set of commands. More importantly though, your bot is also likely to communicate to a third-party API in response to the input you receive from a user.
Here are a few other things you may consider implementing for your bot:
- Respond to a
UserAddedevent, and when you detect that the bot has been added to a chat, post a message to that chat introducing the bot to everyone. - Implement a
helpcommand that will respond with a list of commands your bot is capable of responding to. - If your bot will be installed by users outside of your own organization, you will need to implement a persistence layer to store the API access keys associated with each of the organizations that have installed your bot.
Fork this bot on Github
Feel free to save time by forking the bot discussed in this walkthrough at Github.