Interaction Quick Start
Welcome to the RingCX Platform. In this Quick Start, we are going to help you generate a list of threads that agents can engage customers via. Obtaining a reference to a thread is the first step in taking action on an interaction with a customer, including creating an intervention. The Quick Start will have you up and running in minutes. Let's get started.
Obtain Access Key
The first thing you need to do is obtain an API Access Token if you do not already have one. Access tokens can be created and/or accessed via the "API access token" area in the "Admin" area of your RingCX portal.
How to generate a RingCX API access token
-
Login to your RingCX portal and click on the "Admin" menu located in the top, horizontal menu.
-
Select "API access tokens" towards the bottom of the left hand menu.
-
You should see a list of access tokens if any have been provisioned. Select the token, or click the "+" button to create a new one.
-
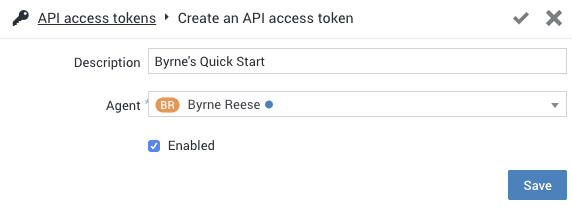
Finally, enter a label/description for your token, and select an Agent on which the token will act on behalf of. Make sure the token is "enabled" and click "Save".

Make note of the access token generated as you will need it later.
Create a file called threads.js. Be sure to edit the variables in <ALL CAPS> with your app's credentials. You can find information about <YOUR-DOMAIN> when you login into RingCX Digital Admin portal. Copy the first part before the "." from the url which should look like : https://xyz.digital.ringcentral.com. So in this case the your domain is "xyz".
var https = require('https')

const SERVER = '<YOUR-DOMAIN>.api.digital.ringcentral.com'
const ACCESS_TOKEN = '<API-ACCESS-TOKEN>'
const API = "/1.0/content_threads"

var headers = {
        'Authorization': "Bearer " + ACCESS_TOKEN
    }

var options = {host: SERVER, path: API, method: 'GET', headers: headers};

var get_req = https.get(options, function(res) {
      var response = ""
      res.on('data', function (chunk) {
          response += chunk
        }).on("end", function(){
          if (res.statusCode == 200)
            console.log(response)
          else
            console.log(res.statusCode)
        });
    }).on('error', function(e) {
          console.log(e.message)
    });
Run Your Code
You are almost done. Now run your script.
$ node threads.js
Create a file called threads.py. Be sure to edit the variables in <ALL CAPS> with your app's credentials. You can find information about <YOUR-DOMAIN> when you login into RingCX Digital Admin portal. Copy the first part before the "." from the url which should look like : https://xyz.digital.ringcentral.com. So in this case your domain is "xyz".
import requests

SERVER = "https://<YOUR-DOMAIN>.api.digital.ringcentral.com"
ACCESS_TOKEN = '<API-ACCESS-TOKEN>'
API = "/1.0/content_threads"

try:
    url = SERVER + API
    headers = {
            'Authorization': 'Bearer ' + ACCESS_TOKEN
            }
    try:
        response = requests.get(url, headers=headers)
        if response.status_code == 200:
            print (response._content)
        else:
            print (response.status_code)
    except Exception as e:
        raise ValueError(e)
except Exception as e:
    raise ValueError(e)
Run Your Code
You are almost done. Now run your script.
$ python threads.py
Create a file called threads.php. Be sure to edit the variables in <ALL CAPS> with your app's credentials. You can find information about <YOUR-DOMAIN> when you login into RingCX Digital Admin portal. Copy the first part before the "." from the url which should look like : https://xyz.digital.ringcentral.com. So in this case your domain is "xyz".
<?php
$SERVER = "https://<YOUR-DOMAIN>.api.digital.ringcentral.com";
$ACCESS_TOKEN = '<API-ACCESS-TOKEN>';
$API = "/1.0/content_threads";

try {
    $url = $SERVER . $API;
    $headers = array (
          'Authorization: Bearer ' . $ACCESS_TOKEN
        );
    try {
        $ch = curl_init($url);
        curl_setopt($ch, CURLOPT_HTTPHEADER, $headers);
        curl_setopt($ch, CURLOPT_HTTPGET, TRUE);
        curl_setopt($ch, CURLOPT_RETURNTRANSFER, TRUE);
        curl_setopt($ch, CURLOPT_SSL_VERIFYHOST, 0);
        curl_setopt($ch, CURLOPT_TIMEOUT, 600);

        $strResponse = curl_exec($ch);
        $curlErrno = curl_errno($ch);
        if ($curlErrno) {
            throw new Exception($ecurlError);
        } else {
            $httpCode = curl_getinfo($ch, CURLINFO_HTTP_CODE);
            curl_close($ch);
            if ($httpCode == 200) {
              print_r($strResponse."\n");
            }else{
              print_r($httpCode."\n");
            }
        }
    } catch (Exception $e) {
        throw $e;
    }
}catch (Exception $e) {
    throw $e;
}
?>
Run Your Code
You are almost done. Now run your script.
$ php threads.php
Create a file called threads.rb. Be sure to edit the variables in <ALL CAPS> with your app's credentials. You can find information about <YOUR-DOMAIN> when you login into RingCX Digital Admin portal. Copy the first part before the "." from the url which should look like : https://xyz.digital.ringcentral.com. So in this case your domain is "xyz".
require 'faraday'

SERVER = "https://<YOUR-DOMAIN>.api.digital.ringcentral.com"
ACCESS_TOKEN = '<API-ACCESS-TOKEN>'
API = "/1.0/content_threads"

headers = {
  headers: { 'Authorization' => 'Bearer ' + ACCESS_TOKEN }
}
res = Faraday.new(SERVER + API, headers).get

puts res.body
Run Your Code
You are almost done. Now run your script.
$ ruby threads.rb
Need Help?
Having difficulty? Feeling frustrated? Receiving an error you don't understand? Our community is here to help and may already have found an answer. Search our community forums, and if you don't find an answer please ask!
What's Next?
When you have successfully made your first API call, it is time to take your next step towards building a more robust RingCX application.