RingCX Audio Streaming


Overview
RingCX can stream real-time call audio from a contact center conference to a third-party gRPC server. This is useful for integrations such as real-time agent assist tools, transcription engines, and analytics platforms.
Transport
RingCX audio streaming uses gRPC over TLS only. Plaintext gRPC and WebSocket/WSS transports are not supported.
This guide covers two audiences:
- RingCX administrators configuring a workflow that starts and stops streaming during a call. See Part 1.
- Third-party developers implementing the gRPC server that receives streamed audio. See Part 2.
Both parts can be read independently; choose the section that matches your role.
How streaming works at a glance
When streaming is started for a call, RingCX opens a single TLS-encrypted gRPC stream to the third-party server. Each call participant, such as a contact, agent, or bot, is delivered as a separate audio segment over that one stream. The server only receives data; RingCX does not expect audio or events streamed back.
A streaming session goes through this message sequence:
| Message | When it is sent |
|---|---|
DialogInit |
Once when the stream opens. Identifies the call dialog and account context. |
SegmentStart |
Each time a participant joins the stream. Identifies the participant and audio format. |
SegmentMedia |
Repeated during the call. Carries audio payload chunks. |
SegmentInfo |
When optional segment metadata is available, such as a hold or unhold event. |
SegmentStop |
When a participant leaves the stream. |
Current audio streaming uses PCMU (G.711 mu-law) at 8000 Hz with 100 ms chunks. Receivers should still generate code from the full proto and handle the other enum values so they are ready for future codec support.
Part 1: Configuring streaming as a RingCX administrator
This part is for RingCX administrators who want to send call audio to a third-party tool that already exposes a compatible gRPC endpoint. You configure streaming in Workflow Studio; no code is required.
Before you begin
Before configuring streaming, confirm the following:
- RingCX audio streaming is enabled for the account and the queues or campaigns where the workflow will run.
- The third-party vendor's gRPC endpoint hostname and port, such as
partner.example.com:443. The endpoint must be reachable over TLS on port443or10443. - Whether the third-party server requires authentication, and if so, the credential type and value, such as an API key or JWT.
- The audio codec the third-party server supports. PCMU is the default and recommended for the initial release.
- Whether the vendor supports dialog streaming, segment streaming, or both.
Step 1: Open or create a workflow
In the RingCX admin console, open Workflow Studio and either edit an existing workflow or create a new workflow for the queue or campaign you want to stream.
Step 2: Add a Start Stream node after the agent connects
Insert a Start Stream node after the workflow's agent-connected event. The recommended pattern is:
On_Agent_Connected -> start_streaming
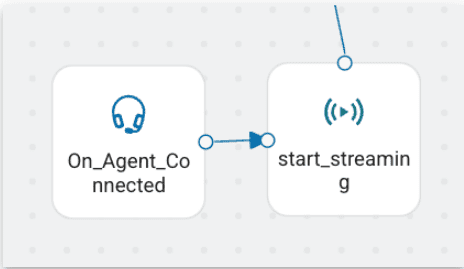
Triggering Start Stream after On_Agent_Connected helps ensure the agent participant is present before RingCX opens the gRPC stream. Do not start streaming in parallel with the agent-connected event.
Configure the Start Stream node with these fields:
| Field | Required | Description |
|---|---|---|
| URL | Yes | The third-party gRPC endpoint hostname and port, for example partner.example.com:443 or partner.example.com:10443. RingCX always connects with TLS; do not enter a plaintext grpc:// endpoint. |
| Segment Streaming | No | Leave unchecked to stream the entire dialog. Check it to stream only a specific participant segment. |
| External Credentials | No | Required only if the third-party server enforces authentication. See Step 3. |
| Audio Encoding | No | Codec for the stream. Defaults to PCMU. Other proto values are PCMA, OPUS, L16, and FLAC. |
| Packet Duration | No | Size of audio chunks in milliseconds, such as 100. Use the default unless the vendor specifies otherwise. |
Note
Audio encoding and packet duration may be fixed to PCMU, 8000 Hz, and 100 ms for the initial release. Confirm supported values with your RingCX representative if your integration depends on a specific codec or chunk size.
Step 3: Configure authentication, if required
If the third-party server requires a token to accept the stream:
- In the Start Stream node, click New Credential next to the External Credentials field.
- Give the credential a recognizable name, such as
Acme Voice AI Key. - Choose the authentication type provided by the vendor, such as API key or JWT.
- Paste the secret value in the Key field.
- Click Save.
The credential appears in the External Credentials dropdown. Select it. RingCX passes the resulting token in the gRPC authorization metadata header on every streaming session.
Step 4: Capture the stream ID with a JavaScript node
After the Start Stream node, add a JavaScript node to save the returned stream ID into session data so you can reference it later, such as when stopping the stream.
sessionData.startStreamResponse = localData.Start_streaming_0.responseCode;
sessionData.responseMessage = localData.Start_streaming_0.responseMessage;
sessionData.startStreamId = localData.Start_streaming_0.streamId;
Adjust Start_streaming_0 if your Start Stream node has a different name.
Step 5: Add a Stop Stream node
Add a Stop Stream node where you want streaming to end, such as On_Interaction_End or On_Agent_Disconnected. In the Stream ID field, reference the value captured in Step 4:
${sessionData.startStreamId}
If you do not add an explicit Stop Stream node, the stream ends automatically when the call ends.
Step 6: Save and assign the workflow
Save the workflow, then assign it where it should run:
- Inbound calls: Assign the workflow to the appropriate voice queue.
- Manual outbound: Go to Users > Agents > [Agent] > General > Login Settings > Manual Outbound Default Workflow.
- Campaign outbound: Go to Dialing > Campaigns > [Campaign] > General > Campaign Settings > Campaign Workflow.
Optional: Segment streaming vs. dialog streaming
By default, a stream covers the entire dialog: every participant audio segment, including callers, agents, and transferred participants, flows over the same gRPC stream until the call ends or the workflow stops the stream.
If you check Segment Streaming on the Start Stream node, the stream is anchored to a specific participant. When that participant leaves the call, the stream ends even if the call continues.
Use dialog streaming for full call recording, transcription, or analytics. Use segment streaming when you only care about one participant, such as a single agent's interaction.
Troubleshooting
| Symptom | What to check |
|---|---|
| Stream never starts | Verify the endpoint uses port 443 or 10443, resolves publicly, presents a trusted TLS certificate, and is reachable from RingCX. |
| Auth error in logs | Confirm the credential type and value match what the vendor expects. The token is sent in the gRPC authorization metadata header. |
| Stream stops immediately | The third-party server may be rejecting the connection. Confirm that it accepts your account, token, TLS connection, and codec. |
| No audio at the partner | Confirm the Start Stream node runs after On_Agent_Connected, the call actually has audio, and the caller is not on hold. Streaming can pause while a caller is on hold. |
Part 2: Implementing a gRPC server to receive audio
This part is for developers building the third-party gRPC server that RingCX streams audio to. RingCX is the gRPC client; your server is the listener. Your server only receives; it does not send a response stream back.
Requirements
- Transport: gRPC over TLS. Plaintext gRPC is rejected.
- Port: Listen on
443or10443. Other ports are not accepted. - RPC shape: Implement the client-streaming
Streaming.StreamRPC defined below. - Authentication: If the customer configures credentials in their workflow, the token arrives in the gRPC
authorizationmetadata header. Validate it when the stream opens and abort withUNAUTHENTICATEDif invalid. - Codec support: At minimum, support PCMU at 8000 Hz. Other codecs in the proto (
OPUS,PCMA,L16, andFLAC) may appear in future releases. - Receiver behavior: Read messages continuously, keep per-segment buffers bounded, and handle stream close or cancellation by flushing or discarding any segment state you own.
Step 1: Get the proto file
Save the proto definition below as ringcx_streaming.proto. This is the contract your server must implement.
syntax = "proto3";
import "google/protobuf/empty.proto";
package ringcentral.ringcx.streaming.v1beta2;

enum Codec {
  CODEC_UNSPECIFIED = 0;
  OPUS = 1;
  PCMA = 2;
  PCMU = 3;
  L16 = 4;
  FLAC = 5;
}

enum ProductType {
  PRODUCT_TYPE_UNSPECIFIED = 0;
  QUEUE = 1;
  CAMPAIGN = 2;
  IVR = 3;
}

enum DialogType {
  DIALOG_TYPE_UNSPECIFIED = 0;
  INBOUND = 1;
  OUTBOUND = 2;
}

enum ParticipantType {
  PARTICIPANT_TYPE_UNSPECIFIED = 0;
  CONTACT = 1;
  AGENT = 2;
  BOT = 5;
}

message Account {
  string id = 1;
  string sub_account_id = 2;
  string rc_account_id = 3;
}

message Product {
  string id = 1;
  ProductType type = 2;
}

message Dialog {
  string id = 1;
  DialogType type = 2;
  optional string ani = 3;
  optional string dnis = 4;
  optional string language = 5;
  map<string, string> attributes = 6;
}

message Participant {
  string id = 1;
  ParticipantType type = 2;
  optional string name = 3;
}

message AudioFormat {
  Codec codec = 1;
  uint32 rate = 2;
  uint32 ptime = 3;
}

message AudioContent {
  bytes payload = 1;
  uint32 seq = 2;
  uint32 duration = 3;
}

service Streaming {
  rpc Stream(stream StreamEvent) returns (google.protobuf.Empty);
}

message StreamEvent {
  string session_id = 1;
  oneof event {
    DialogInitEvent dialog_init = 2;
    SegmentStartEvent segment_start = 3;
    SegmentMediaEvent segment_media = 4;
    SegmentInfoEvent segment_info = 5;
    SegmentStopEvent segment_stop = 6;
  }
}

message DialogInitEvent {
  Account account = 1;
  Dialog dialog = 2;
}

message SegmentStartEvent {
  string segment_id = 1;
  optional Product product = 2;
  Participant participant = 3;
  optional AudioFormat audio_format = 4;
}

message SegmentMediaEvent {
  string segment_id = 1;
  AudioContent audio_content = 2;
}

message SegmentInfoEvent {
  string segment_id = 1;
  string event = 2;
  optional string data = 3;
}

message SegmentStopEvent {
  string segment_id = 1;
}
Step 2: Generate server stubs
Run the protoc compiler for your language. Examples:
python -m grpc_tools.protoc -I. --python_out=. --grpc_python_out=. ringcx_streaming.proto
grpc_tools_node_protoc --js_out=import_style=commonjs:. --grpc_out=grpc_js:. -I. ringcx_streaming.proto
protoc --go_out=. --go-grpc_out=. ringcx_streaming.proto
Use the protobuf Gradle plugin or Maven equivalent with the grpc-java code generator.
Step 3: Implement the Streaming service
Implement the single Stream RPC. RingCX opens a client-streaming call and sends StreamEvent messages. Your server returns google.protobuf.Empty when the stream closes.
function Stream(stream):
  token = stream.metadata["authorization"]
  if auth_required and not is_valid(token):
    abort(UNAUTHENTICATED, "Invalid token")

  for event in stream:
    match event.event:
      case dialog_init:
        # First message; record account and dialog metadata.
      case segment_start:
        # A participant joined; record segment_id, participant, and codec.
      case segment_media:
        # Append audio_content.payload to the buffer or sink for segment_id.
      case segment_info:
        # Optional metadata event, such as hold or unhold.
      case segment_stop:
        # A participant left; flush or finalize that segment.

  return Empty()
Step 4: Configure TLS and listen
Bind your gRPC server to port 443 or 10443 and provide a valid TLS certificate. The hostname configured in the RingCX workflow must match the certificate. Self-signed certificates are not supported for production traffic.
During development, you can stand up a minimal receiver that validates TLS and authentication, logs DialogInit and SegmentStart, and discards audio bytes. This confirms connectivity before you wire up your production audio processing.
Step 5: Validate authentication
If the customer configures credentials in the workflow, every stream arrives with a token in the gRPC authorization metadata key. Your server should:
- Read the
authorizationkey from the incoming call metadata. - Validate it against the credential the customer registered with you.
- If invalid, immediately abort the stream with status
UNAUTHENTICATED. - If valid, proceed to read
StreamEventmessages.
Step 6: Decode audio
The first SegmentStartEvent for each participant carries an AudioFormat specifying the codec, sample rate, and packet duration. Use this to decode the payload bytes in subsequent SegmentMediaEvent messages.
For the initial release:
- Codec:
PCMU(G.711 mu-law) by default. - Sample rate:
8000Hz. - Packet duration: typically
100ms per chunk.
Each SegmentMediaEvent also includes a sequence number (seq) and chunk duration in milliseconds. Use these fields for ordering, duplicate detection, and gap detection.
Expected message ordering
A typical session looks like this on the wire:
DialogInit              (once, at stream open)
SegmentStart  (caller)  (caller joins)
SegmentMedia  (caller)  (audio chunks, repeated)
SegmentStart  (agent)   (agent joins)
SegmentMedia  (caller)  (chunks continue, interleaved)
SegmentMedia  (agent)
SegmentStop   (agent)   (agent leaves)
SegmentMedia  (caller)
SegmentStop   (caller)  (call ends)
(stream closes)
Multiple participants can be active simultaneously. Disambiguate them using the segment_id field carried on each segment event.
Reference: enum values to handle
| Enum | Values |
|---|---|
DialogType |
INBOUND (1), OUTBOUND (2) |
ParticipantType |
CONTACT (1), AGENT (2), BOT (5). BOT is 5, not 3. |
ProductType |
QUEUE (1), CAMPAIGN (2), IVR (3, reserved for future use) |
Codec |
OPUS (1), PCMA (2), PCMU (3), L16 (4), FLAC (5) |
Reference: end-to-end flow
Putting it together, here is what happens when a streamed call takes place:
- A call arrives at RingCX, either inbound or outbound.
- The configured workflow runs, the agent connects, and the workflow reaches the Start Stream node after
On_Agent_Connected. - RingCX opens a TLS gRPC connection to the third-party server endpoint and sends a
DialogInitmessage. - Each participant joining the call triggers a
SegmentStartmessage. - During the call, audio is delivered as a continuous flow of
SegmentMediamessages. - Optional segment metadata is delivered with
SegmentInfo. - As participants leave,
SegmentStopmessages are sent for each participant. - When the workflow reaches the Stop Stream node, or when the call ends, the gRPC stream closes.
Support and feedback
If you need help enabling or troubleshooting RingCX audio streaming, contact your RingCentral representative. Include the workflow name, approximate call time, configured endpoint hostname, stream ID if available, codec settings, and any gRPC status code returned by the receiver.