Configuring the Workforce Management Integration


Some workforce management integrations are already built in such as Verint Monet, Pipkins, and Aspect. However, receiving event notifications for agent state changes, or even call details after the call has ended, are needed for other implementations of workforce management including home grown ones. For such integrations, we provide a generic HTTP notification (also known as a WebHook) to the endpoint of your choosing.
How to Get to Integrations
First step to configure Workforce Management Integration is getting to the configuration screen. First, login as an Admin user to configure the settings for your account.
- Navigate to the Settings (look for the gear icon)

- Select Accounts
- Choose the account you want to use for this integration
- Select Integrations
- Select Generic HTTP in the Type field to configure your own endpoint for events.
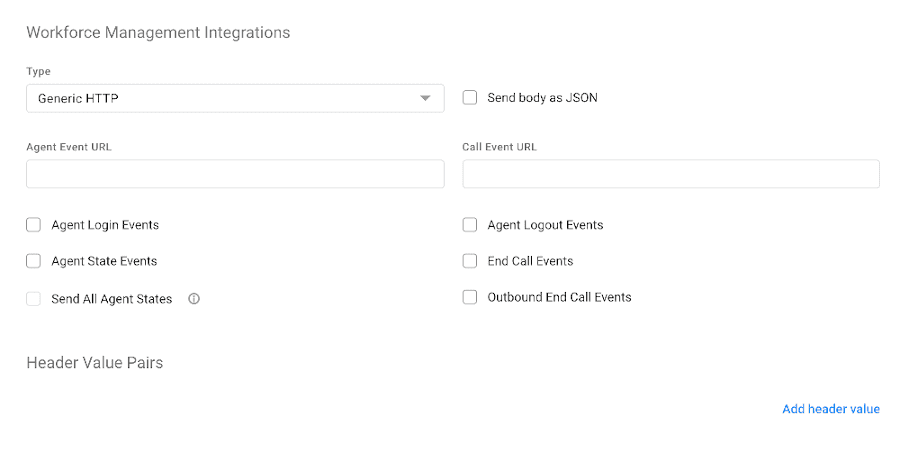
This will bring you to the Workforce Management Integrations page where you can begin configuring the Generic HTTP.
Choosing How to Send Details
There are two formats for sending the details of an event:
-
URL Encoded
A string of parameters detailing the event. This format puts the details in the URI and encodes it with URL encoding to safely transmit it over the internet. This is the default setting if JSON is not checked.
-
JSON
Creates a JSON body of the details for the event. Since this is JSON, it's sent as part of the request body instead of the query string. You must check the box "Send body as JSON".
Setting Endpoints for Events
Two types of events are created by Workforce Management Integration; agent states and end call. Each type of event can have different endpoints. Enter your Agent Event URL to receive agent events to that endpoint. Similarly, enter your Call Event URL to receive end call events to that endpoint. If you want to have the same endpoint receive both event types, just make sure the same URL is entered in both fields.
Choosing the Types of Events to Send
-
Agent States
Agent states include the default states as listed below:
State Description AvailableThis default state indicates the agent is ready to take or make a call On BreakAn agent selectable state to indicate they are unavailable for a short period AwayAn agent selectable state to indicate they are unavailable to take or make calls LunchAn agent selectable state to indicate they are unavailable for a longer lunch period TrainingAn agent selectable state to indicate they are in training and may not be available EngagedAn automatic state when an agent is on a call (off-hook) WorkingAn automatic state when an agent is on a call Additional custom states can also be created and for events to be triggered for custom states, the "Send All Agents States" must be selected. You can also limit the agent states to only login event by just selecting "Agent Login Events" and/or only logout events by selecting "Agent Logout Events". More state event details can be found in the Agent State Information
-
End Call
At the end of a call, an event can be sent with call details including the agent who picked up the call, when the call was answered, how long the call duration was for, and a link to the call recording. A full list of call details can be found in the End Call Events Information
Adding Custom Headers
Your endpoint may require some request headers to be sent with the request. For example, you may want to include a basic authorization header with the customer's username and password to make sure the event details you are receiving is aligned to the customer account at the end point. Simply add the header to the key-value fields after base64 encoding the "username:password":
| Key | Value |
|---|---|
| Authorization | Basic YWxhZGRpbjpvcGVuc2VzYW1l |