About Agent Scripting


Agent scripting is a powerful tool for both your agents and your business that functions similarly to a script in a movie or play. It’s a prompt that helps agents to move smoothly through their interactions with leads and customers. You can learn a lot more from the Script Designer and the corresponding Script Studio.
As you get deeper into Agent Scripting, you'll want to customize the agent experience to go beyond just an agent script and the best way to do that is through the WWW tool and JavaScript tool. This guide will walk you through some examples of using the WWW tool to invoke external APIs and the JavaScript tool for processing the response and using the data you gather from the WWW tool.
Example
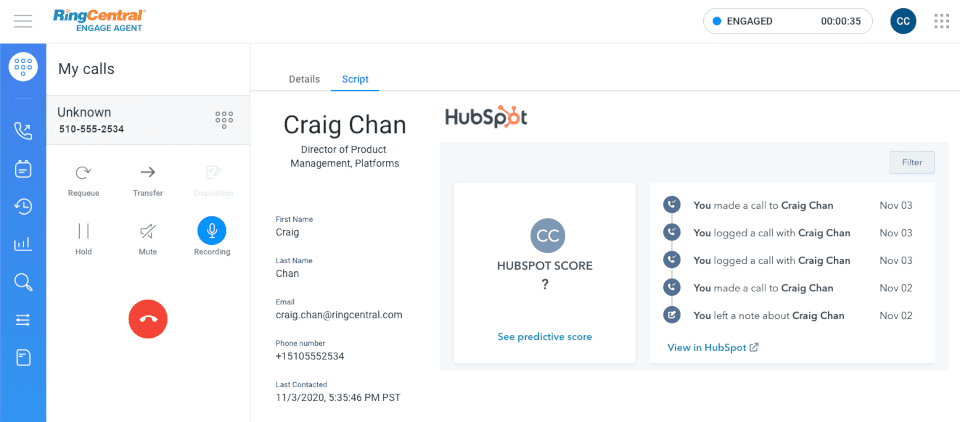
In this example we are going to look up the caller in HubSpot and bring up their HubSpot contact record in the agent script area within an iFrame element. This way, the agent doesn't have to leave the page to view information or update the contact record.

As you can see from the workflow, our steps are:
- Retreive Contact - Lookup the contact by telephone number (ANI)
- Process Response - Find the profile-url in the response body
- Display HubSpot Page - Using the profile-url in an iFrame, load the contact page.
Let's go through them one-by-one.
Retrieve Contact
The first step is to lookup the contact by telephone number. In this case, we record the incoming number as the ANI (Automatic Number Identification). We will retrieve this contact using the HubSpot API, but we are going to use a proxy through an AWS Lambda function to communicate with HubSpot.
Note
While the HubSpot API is CORS-enabled and does support the OPTIONS HTTP method type, the response does not include the Access-Control-Allow_Origin so we can not confirm that HubSpot is CORS enabled.
To make this request, we make a GET request to an AWS Lambda function. It should look something like this.
https://herkfsds9a.execute-api.us-west-1.amazonaws.com/default/hubspotRequestRepeater?q=:phone
Note
The AWS server above is not the same as the one you create. You need to create your own AWS Lambda function and have your own AWS server to run it from.
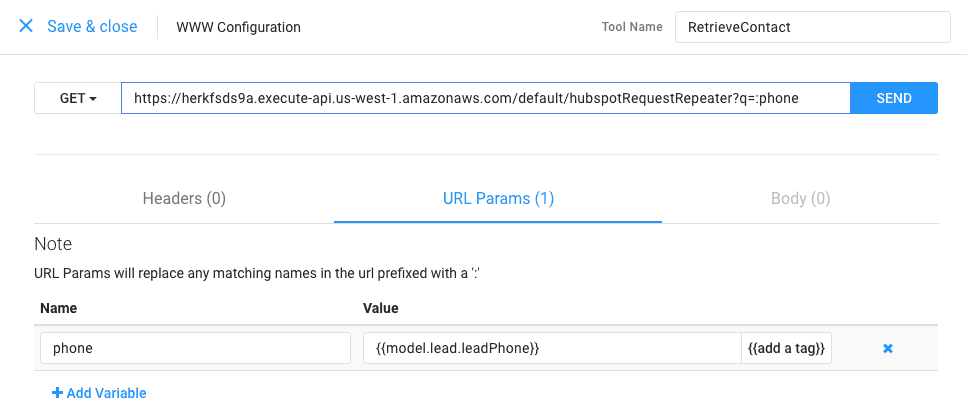
Notice the q=:phone. We are defining phone as a URL Parameter and this is how we put it into the query string. The caller's phone is automatically discovered by RingCX and put into the tool's model object. To retrieve it, we access the model like so:
{{model.lead.leadPhone}}
This means your WWW tool should be configured as below:
That Special AWS Lambda Function
Notice that GET request goes to an AWS server? This is our Lambda function to proxy the request to HubSpot. This example is more about how to use RingCX, but to make sure you are successful with the complete solution, I've included the code below. Just make sure to set your environment variables in AWS Lambda.
| Key | Value |
|---|---|
| ACCESS_CONTROL_ALLOW_ORIGIN | * |
| API_KEY | {yourHubSpotApiKey} |
| HOST | api.hubapi.com |
| PATH | /contacts/v1/search/query |
const https = require('https');
const querystring = require('querystring');

/* ========Config Section======== */
const host = process.env.HOST;
const path = process.env.PATH;
const accessControlAllowOriginValue = process.env.ACCESS_CONTROL_ALLOW_ORIGIN;
const accessControlAllowHeadersValue = process.env.ACCESS_CONTROL_ALLOW_HEADERS;

// API KEY
const apiKey = process.env.API_KEY;
/* ========Config Section======== */

const request = (queryStringParameters, headers) => {

    const requestOptions = {
       host: host,
       path: path,
       port: 443,
       method: 'GET',
    };

    if (queryStringParameters) {
        requestOptions.path = `${requestOptions.path}?${querystring.stringify(queryStringParameters)}&hapikey=${apiKey}`;
    }

    headers['Accept'] = 'application/json';
    headers['accept-encoding'] = 'identity';
    headers['Host'] = host;

    requestOptions.headers = headers;

    return new Promise((resolve, reject) => {
        https.request(requestOptions, response => {
            let data = '';
            response.on('data', chunk => {
                data += chunk;
            });
            response.on('end', () => {
                const dataObject = JSON.parse(data);
                response.data = dataObject;
                resolve(response);
            });
        })
            .on('error', error => {
                reject(error);
            })
            .end();
    });
};

exports.handler = (event, context, callback) => {

    const corsHeaders = {
        'Access-Control-Allow-Origin': accessControlAllowOriginValue,
        'Access-Control-Allow-Headers': accessControlAllowHeadersValue
    };

    const repeatResponse = (response) => {
        let multiValueHeaders = {};

        for (const headerName in response.headers) {
            if (Array.isArray(response.headers[headerName])) {
                multiValueHeaders[headerName] = response.headers[headerName];
                delete response.headers[headerName];
            }
        }

        callback(null, {
            statusCode: response.statusCode,
            body: JSON.stringify(response.data),
            headers: { ...response.headers, ...corsHeaders },
            multiValueHeaders: multiValueHeaders,
        });
    };

    const sendError = (error) => {
        callback(null, {
            statusCode: '400',
            body: JSON.stringify(error),
            headers: corsHeaders,
        });
    };

    switch (event.httpMethod) {
        case 'GET':
            request(event.queryStringParameters, event.headers)
                .then((response) => {
                    repeatResponse(response);
                })
                .catch(error => {
                    sendError(error);
                });
            break;
        default:
            sendError(new Error(`Unsupported method "${event.httpMethod}"`));
    }
};
Process Response
At this point, HubSpot should have looked up the contact by our ANI. We now need to process this response using our Scripting tool. The Scripting tool is just a part of the workflow that has JavaScript in it to perform more powerful actions like parsing the response for the profile-url.
var wwwResponse = getData('model.model.RetrieveContact');

// Find the first contact in the search results
var firstContact = wwwResponse.contacts[0];
var hubspotUrl = firstContact["profile-url"];

// Capture the contact ID
var vId = firstContact.vid;

// Capture the Hub ID of the portal in question
var portalId = firstContact["portal-id"];

// Let's get details about this contact
// Store the first name
putData("firstName", firstContact.properties.firstname.value);
// Store the last name
putData("lastName", firstContact.properties.lastname.value);
// Store the job title
putData("jobTitle", firstContact.properties.jobtitle.value);
// Store the phone
putData("phone", firstContact.properties.phone.value);
// Store the email
putData("email", firstContact.properties.email.value);
// Store last contacted date
var rawLastContactDate = firstContact.properties.notes_last_contacted.value;
var lastContactedDate = new Date(rawLastContactDate*1);
putData("lastContacted", lastContactedDate.toLocaleString("en-US", {timeZoneName: "short"}));

// Put together the URL for Contact Timeline Embed
var hubspotUrl = "app.hubspot.com/contact-timeline-embed/"+portalId+"/login?id="+vId;
putData("hubspotURL", hubspotUrl);

return goTo("Hubspot_Page");
Now let's dissect each of those lines.
When you use the WWW tool, the response is stored in a local model object in the Script Studio. To retrieve this response, we need to reference the previous WWW tool by its name, RetrieveContact. Notice the way we do this is by using the method getData.
var wwwResponse = getData('model.model.RetrieveContact');
What we just retrieved is a JSON object, which is exactly what we want. Now when using this API from HubSpot, we are basically "searching" for a contact with that phone number and since the number is unique in our HubSpot, the first entry will be the one we are looking for.
var firstContact = wwwResponse.contacts[0];
With this contact, we want to construct a "Contact Timeline Embed", which is a URL to bring up an activity timeline for the contact.
First we need the contact ID which is the vid in the JSON response.
var vId = firstContact.vid;
Then we capture the Hub ID of the portal. Notice we use bracket notation here because using dot notation would have issue with the dash (-) in the name of the field.
var portalId = firstContact["portal-id"];
We can then construct the "Contact Timeline Embed" using these two IDs.
var hubspotUrl = "app.hubspot.com/contact-timeline-embed/"+portalId+"/login?id="+vId;
Now we can store that HubSpot URL into our model object so we can use it in the Page tool.
putData("hubspotURL", newUrl);
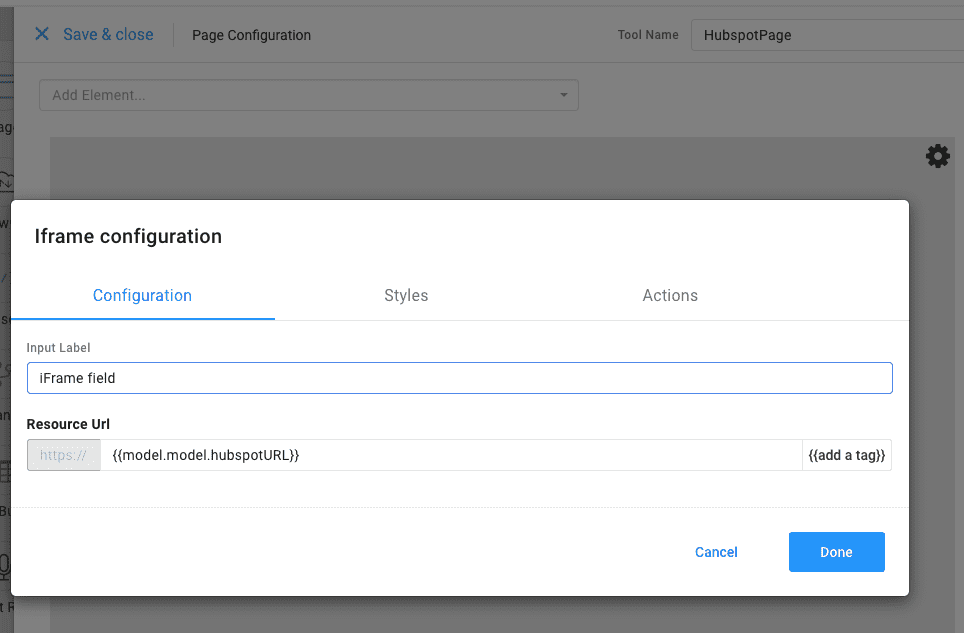
Display HubSpot Page
Now we are ready to bring up the page to display to the agent. To do this we need to use the Page tool. When you edit the Page tool you can configure the URL the page should display by clicking on the gear icon. Here we'll add a tag to retrieve the URL we just put into the model object.
{{model.model.hubspotURL}}
Ready to test it out? You can use the "Render" to try it out, but since you don't have a real number, it will just return all the contacts in your HubSpot instance. It would be better to test just one number that you know so pick one contact's number and go all the way back up to our first step, the WWW tool. Replace {{model.lead.leadPhone}} with a real 10 digit number.
You may notice that I added some other contact details into our model object including first name, last name, email, and phone. This is used to create a richer agent view of the contact record when a contact calls the agent. There's a lot you can do with the page tool so go ahead and try it out.